Supabase User Self-Deletion: Empower Users with Edge Functions

Support Engineer @Supabase | StackOverflow
If you're looking to enhance user management in your applications, Supabase and Edge functions have the perfect solution. In this guide, we'll explore how to enable self-deletion and user invalidation, providing users with greater control over their accounts while maintaining top-notch security.
Leveraging Supabase for Powerful User Management
Supabase is an open-source platform that simplifies database-backed application development. From APIs to authentication and serverless functions, Supabase offers an all-in-one solution for robust applications.
In this tutorial, we'll build upon the user management example provided in Supabase's GitHub repository. By leveraging the Next.js user management example, we already have the foundation for sign-up, login, and password reset functionalities.
Taking User Management to the Next Level
Our goal is to enhance the user management system with self-deletion and user invalidation capabilities. With these features, users can choose to delete their accounts, while administrators can disable or invalidate accounts when necessary.
Our starting point for this project is the user management example that Supabase provides in their GitHub repository. Specifically, we'll use the Next.js user management example as our base code. This project already includes a lot of the functionality you'll need to build a robust user management system, including sign-up, login, and password reset flows.
However, we will take things a step further by adding self-deletion and user invalidation capabilities to the system. This will allow users to delete their accounts if they choose to and also give administrators the ability to disable or invalidate user accounts if necessary.
To achieve this, we'll leverage Supabase's edge functions, which allow you to run serverless code right at the edge of your network, close to your users. This makes it possible to build highly responsive and scalable applications that can handle many user interactions.
Setting the profiles table cascade deletions:
Go into the Supabase Dashboard and edit the profiles table:
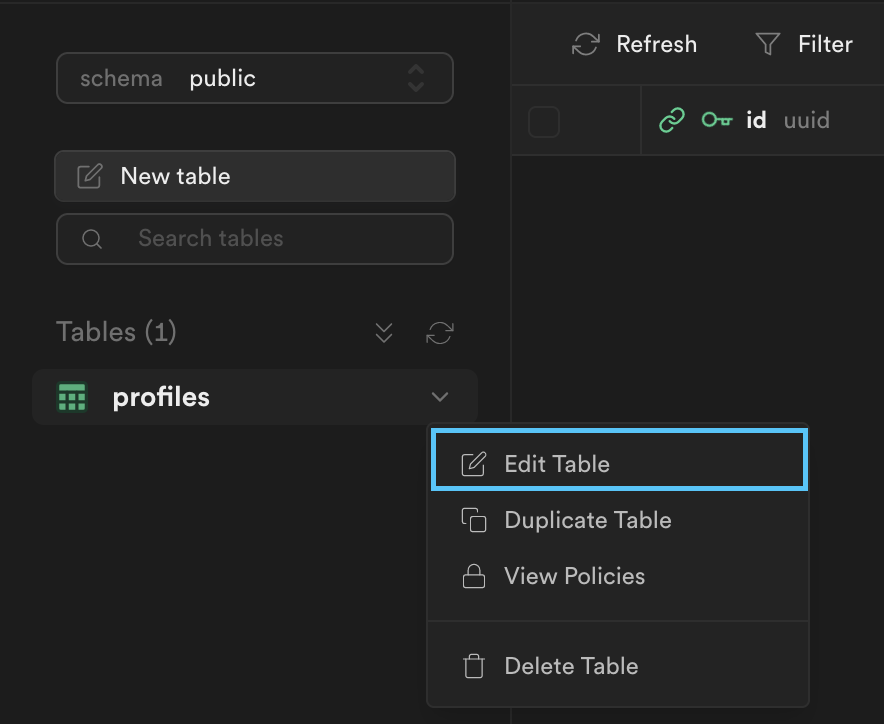
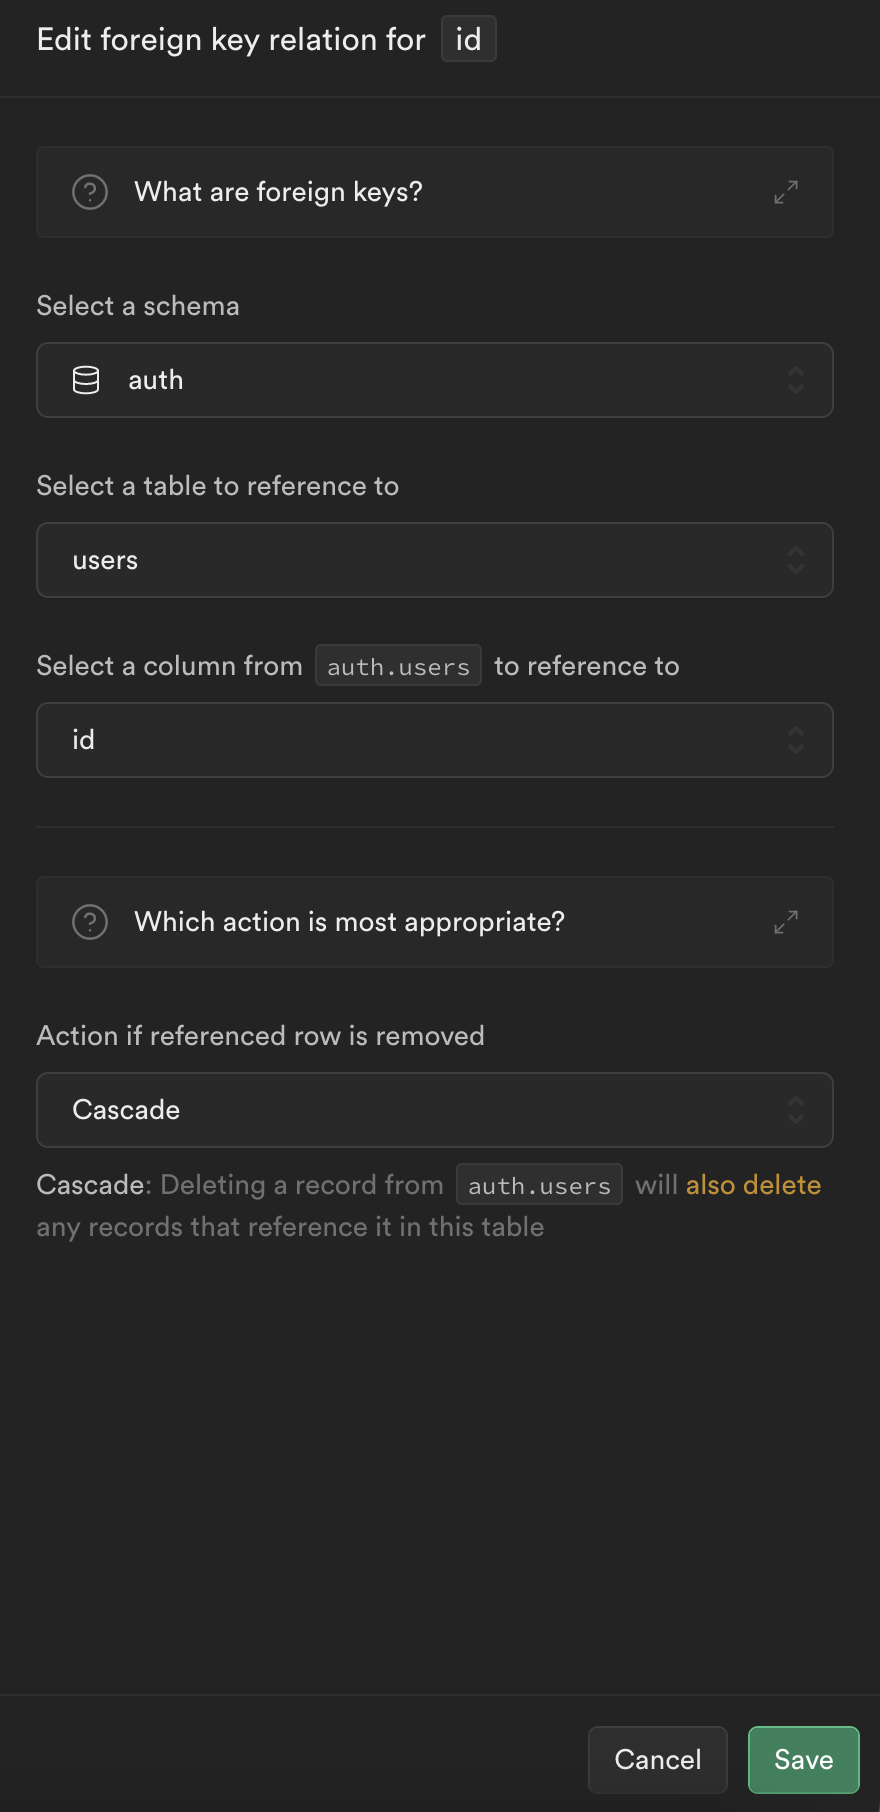
Then, select the square for the foreign key:
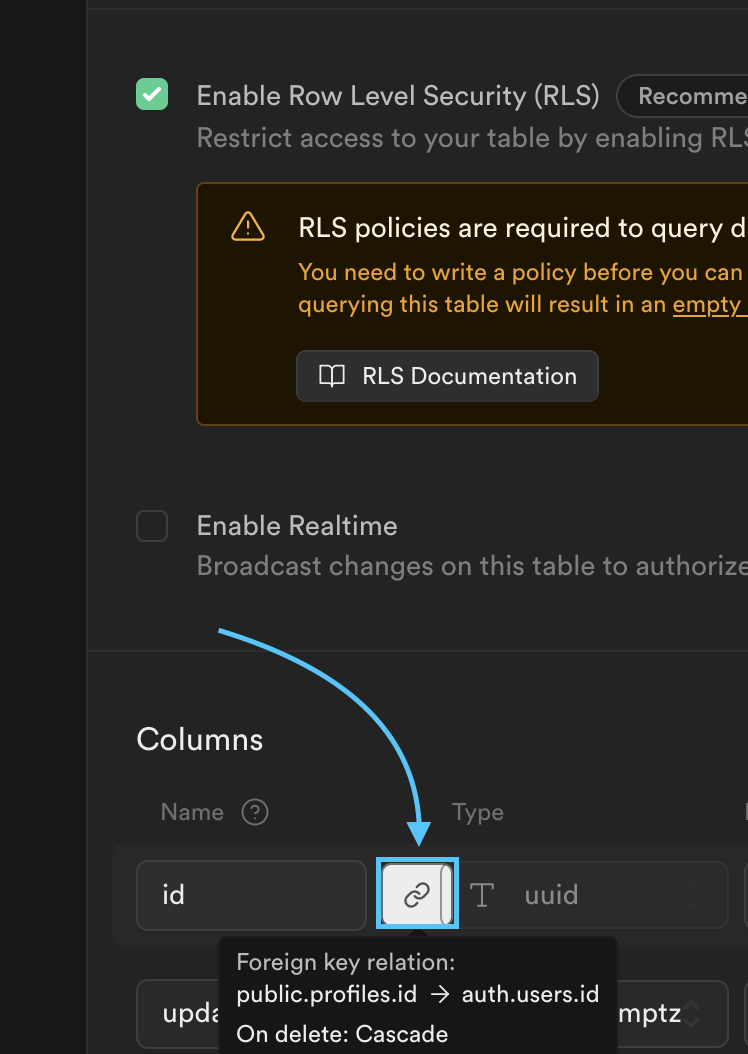
Make sure this model looks exactly like this on the delete cascade. What this does is it will delete the row if the source/ reference row is deleted.
Extending Web App Functionality
In the web app, we'll create a delete function that handles the deletion request. By importing the router and setting modal states, we enable a smooth deletion process for users.
We'll need to import the router and set the modal states for the Accounts.tsx file:
import { useRouter } from 'next/router'

const [isModalOpen, setIsModalOpen] = useState(false)
const router = useRouter()
Then, you can create a delete function that will be responsible to fulfilling the deletion request:
  async function deleteAccount() {
    try {
      setLoading(true)
      if (!user) throw new Error('No user')
      await supabase.functions.invoke('user-self-deletion')
      alert('Account deleted successfully!')
    } catch (error) {
      alert('Error deleting the account!')
      console.log(error)
    } finally {
      setLoading(false)
      setIsModalOpen(false)
      // Note that you also will force a logout after completing it
      await supabase.auth.signOut()
      router.push('/')
    }
  }
Then, updating the logout logic:
        <button className="button block" onClick={async () => {
                                                  await supabase
                                                  .auth.signOut()
                                                  router.push('/')
                                                  }}>
Then, adding the self-deletion feature:
<div>
<button className="button error block" onClick={() => setIsModalOpen(true)}>
Delete Account
</button>
</div>
{isModalOpen && (
<div className="modal-container">
<div className="modal-content">
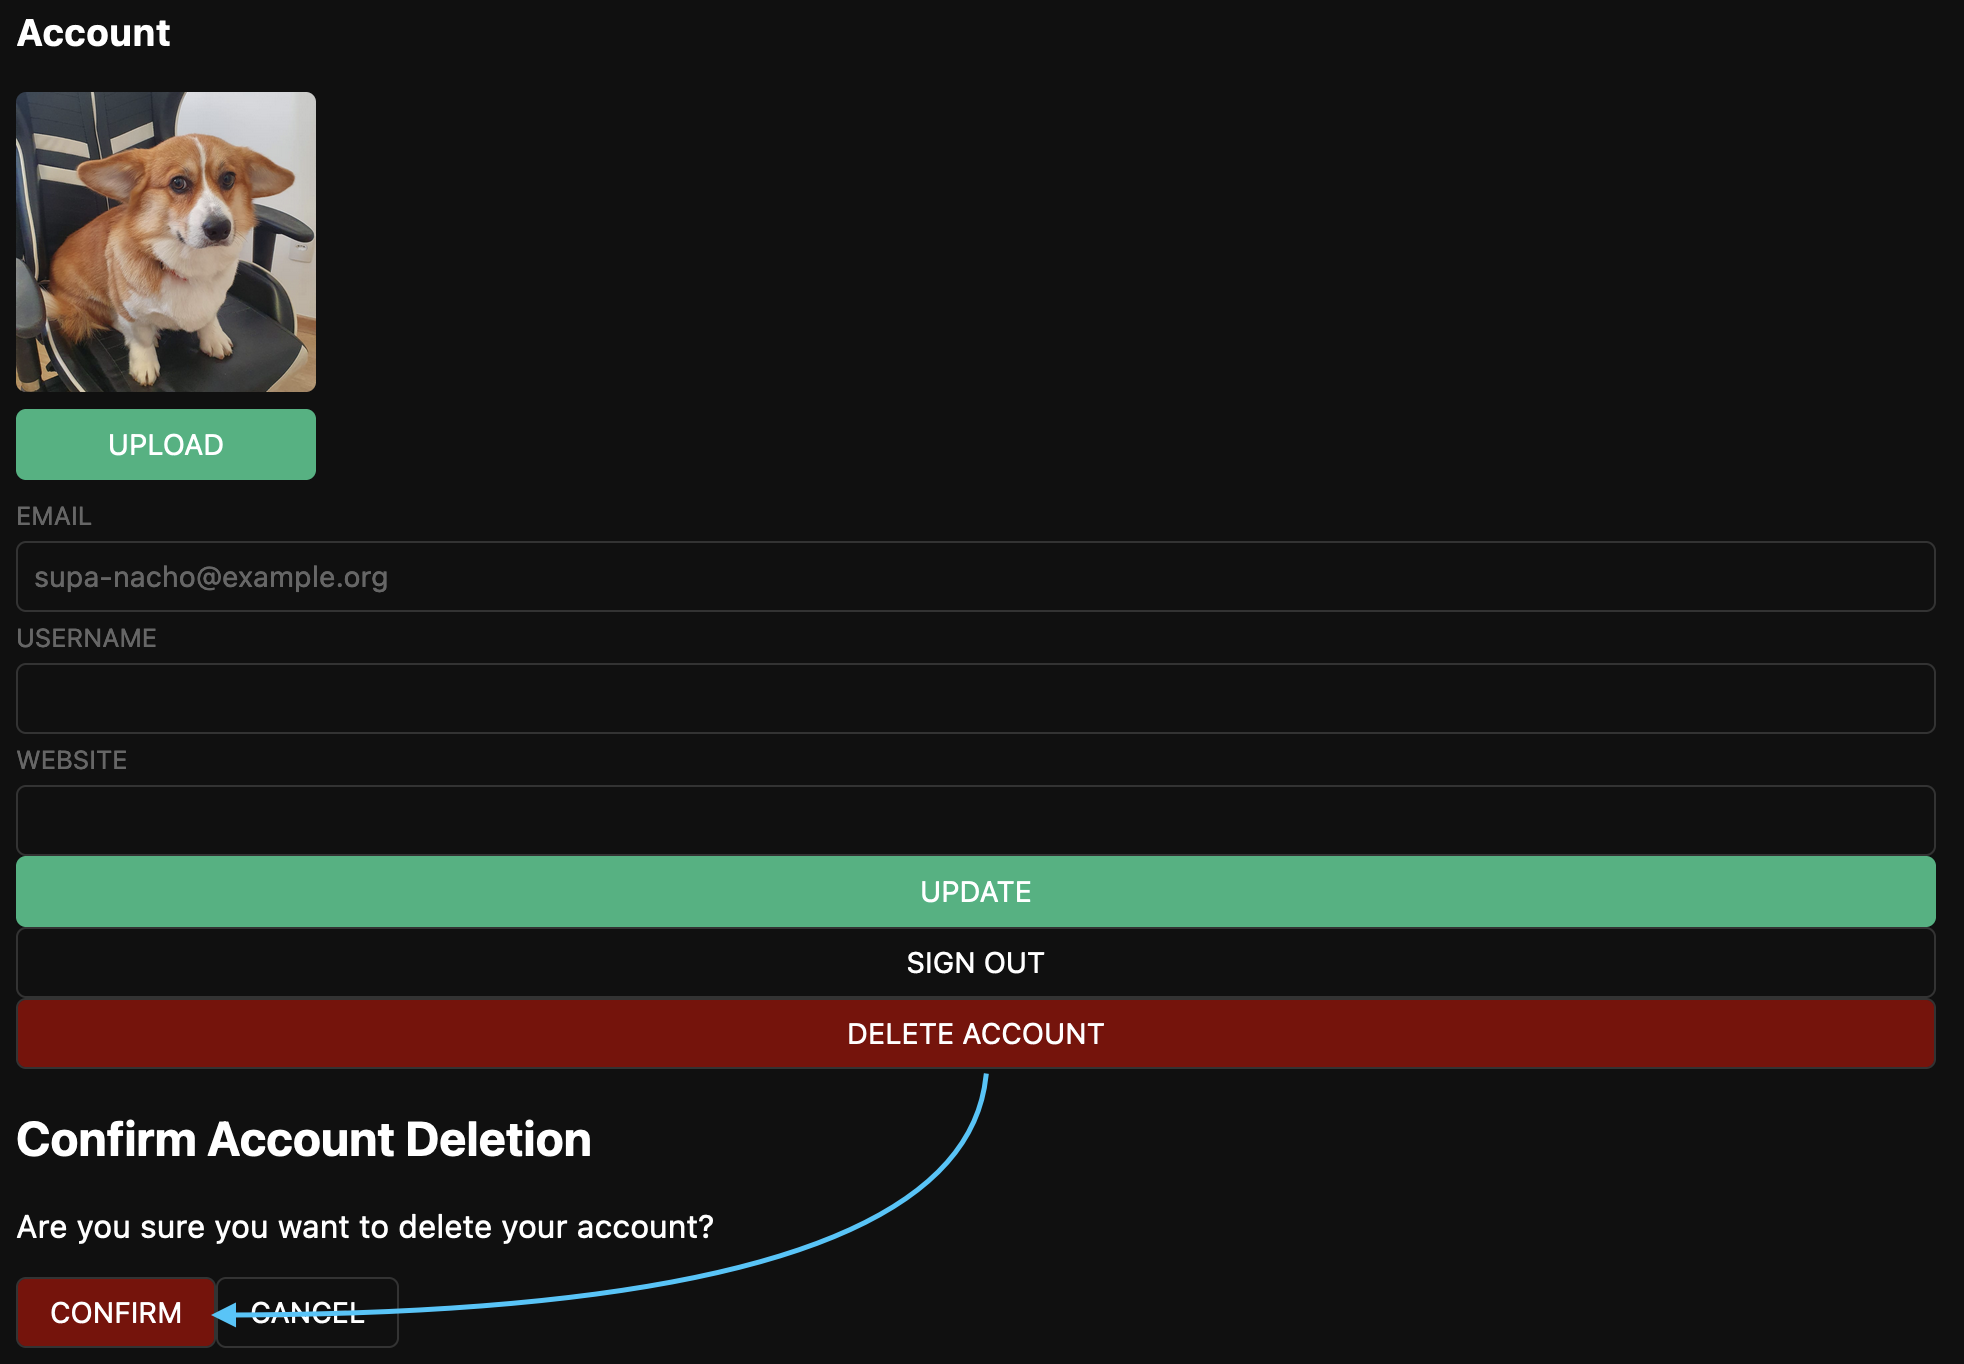
<h2>Confirm Account Deletion</h2>
<p>Are you sure you want to delete your account?</p>
<div>
<button className="button error" onClick={deleteAccount}>
Confirm
</button>
<button className="button" onClick={() => setIsModalOpen(false)}>
Cancel
</button>
</div>
</div>
</div>
)}
You can find the complete code for this Account.tsx component on GitHub. Now, we'll add a tiny CSS adjustment to make the deletion buttons red:
.button.error {
  background-color: maroon;
}
Example:
With these updates, users can now delete their accounts while also experiencing a seamless logout process.
Implementing Self-Deletion with Edge Functions:
Now, we will create the edge functions that will perform the user deletion/data invalidation. Both functions should be easily replaceable in the web code. We'll be using this cors.ts file for handling the CORS headers:
export const corsHeaders = {
  'Access-Control-Allow-Origin': '*',
  'Access-Control-Allow-Headers': 'authorization, x-client-info, apikey, content-type',
}
import { serve } from 'https://deno.land/std@0.182.0/http/server.ts'
import { createClient } from 'https://esm.sh/@supabase/supabase-js@2.14.0'
import { corsHeaders } from '../_shared/cors.ts'

console.log(`Function "user-self-deletion" up and running!`)

serve(async (req: Request) => {
  // This is needed if you're planning to invoke your function from a browser.
  if (req.method === 'OPTIONS') {
    return new Response('ok', { headers: corsHeaders })
  }
  try {
    // Create a Supabase client with the Auth context of the logged in user.
    const supabaseClient = createClient(
      // Supabase API URL - env var exported by default.
      Deno.env.get('SUPABASE_URL') ?? '',
      // Supabase API ANON KEY - env var exported by default.
      Deno.env.get('SUPABASE_ANON_KEY') ?? '',
      // Create client with Auth context of the user that called the function.
      // This way your row-level-security (RLS) policies are applied.
      { global: { headers: { Authorization: req.headers.get('Authorization')! } } }
    )
    // Now we can get the session or user object
    const {
      data: { user },
    } = await supabaseClient.auth.getUser()
    // And we can run queries in the context of our authenticated user
    const { data: profiles, error: userError } = await supabaseClient.from('profiles').select('id, avatar_url')
    if (userError) throw userError
    const user_id = profiles[0].id
    const user_avatar = profiles[0].avatar_url
    const supabaseAdmin = createClient(
      Deno.env.get('SUPABASE_URL') ?? '',
      Deno.env.get('SUPABASE_SERVICE_ROLE_KEY') ?? ''
    )
    const { data: avatar_deletion, error: avatar_error } = await supabaseAdmin
      .storage
      .from('avatars')
      .remove([user_avatar.name])
    if (avatar_error) throw avatar_error
    console.log("Avatar deleted: " + JSON.stringify(avatar_deletion, null, 2))
    const { data: deletion_data, error: deletion_error } = await supabaseAdmin.auth.admin.deleteUser(user_id)
    if (deletion_error) throw deletion_error
    console.log("User & files deleted user_id: " + user_id)
    return new Response("User deleted: " + JSON.stringify(deletion_data, null, 2), {
      headers: { ...corsHeaders, 'Content-Type': 'application/json' },
      status: 200,
    });
  } catch (error) {
    return new Response(JSON.stringify({ error: error.message }), {
      headers: { ...corsHeaders, 'Content-Type': 'application/json' },
      status: 400,
    })
  }
})
You can also delete all objects that belong to the user by getting the whole list like this:
//Note: this will pick 100 object items if no limit is set.
const { data: list_of_files, error: storageError } = await supabaseClient.storage.from('avatars').list()

if (storageError) throw storageError
const file_urls = []
for (let i = 0; i < list_of_files.length; i++) {
  file_urls.push(list_of_files[i].name)
}

const { data: avatar_deletion, error: avatar_error } = await supabaseAdmin
      .storage
      .from('avatars')
      .remove(file_urls)
Implementing User Invalidation with Edge Functions
In addition to self-deletion, we'll implement user invalidation capabilities using edge functions. This allows administrators to disable users when required. Here's how to set it up:
import { serve } from 'https://deno.land/std@0.182.0/http/server.ts'
import { createClient } from 'https://esm.sh/@supabase/supabase-js@2.14.0'
import { corsHeaders } from '../_shared/cors.ts'

console.log(`Function "user-invalidation" up and running!`)

serve(async (req: Request) => {
  // This is needed if you're planning to invoke your function from a browser.
  if (req.method === 'OPTIONS') {
    return new Response('ok', { headers: corsHeaders })
  }
  try {
    // Create a Supabase client with the Auth context of the logged in user.
    const supabaseClient = createClient(
      // Supabase API URL - env var exported by default.
      Deno.env.get('SUPABASE_URL') ?? '',
      // Supabase API ANON KEY - env var exported by default.
      Deno.env.get('SUPABASE_ANON_KEY') ?? '',
      // Create client with Auth context of the user that called the function.
      // This way your row-level-security (RLS) policies are applied.
      { global: { headers: { Authorization: req.headers.get('Authorization')! } } }
    )
    // Now we can get the session or user object
    const {
      data: { user },
    } = await supabaseClient.auth.getUser()
    // And we can run queries in the context of our authenticated user
    const { data: profiles, error: user_error } = await supabaseClient.from('profiles').select('id')
    if (user_error) throw user_error
    const user_id = profiles[0].id
    // Create the admin client to delete files & user with the Admin API.
    const supabaseAdmin = createClient(
      Deno.env.get('SUPABASE_URL') ?? '',
      Deno.env.get('SUPABASE_SERVICE_ROLE_KEY') ?? ''
    )
    const { data: invalidate_user, invalidation_error } = await supabaseAdmin.auth.admin.updateUserById(
      '6aa5d0d4-2a9f-4483-b6c8-0cf4c6c98ac4',
      {
        email: user_id.concat('@deleted-users.example.com'),
        phone: "",
        user_metadata: { deleted: true },
        app_metadata:  { deleted: true }
      }
    )
    if (invalidation_error) throw invalidation_error
    const { data: invalidate_profile, invalid_profile_error } = await supabaseAdmin.from('profiles')
    .update({ full_name: '', username: '', avatar_url: '', website:''})
    .eq('id', user_id)
    if (invalid_profile_error) throw invalid_profile_error
    console.log('profile_invalidated:'+JSON.stringify(invalidate_profile, null, 2))
    return new Response("User invalidated: " + JSON.stringify(invalidate_user, null, 2), {
      headers: { ...corsHeaders, 'Content-Type': 'application/json' },
      status: 200,
    });
  } catch (error) {
    return new Response(JSON.stringify({ error: error.message }), {
      headers: { ...corsHeaders, 'Content-Type': 'application/json' },
      status: 400,
    })
  }
})
You'll need to deploy either of these functions with the Supabase CLI.
supabase functions deploy user-self-deletion
By deploying these functions using the Supabase CLI, we create a powerful user management system with self-deletion and user invalidation features. The full example is in the User Self-Deletion NextJS repo.
Supabase and edge functions offer incredible possibilities for user management. Expanding the user management example with self-deletion and user invalidation empowers users while maintaining the utmost security. Implement these techniques in your projects to take user management to the next level. We also have a guide for Testing Supabase Edge Functions which also works for Dart Edge.
For more tutorials and insights on Supabase and Postgres, explore Mansueli's Tips!